Windows Installation Instructions with Visual Studio
Required Third-Party Libraries
Installation Instructions
Installation will take at least one full work day or more to complete.
Install Cygwin - You can download and install the 32-bit version of Windows here
Choose a Download Source Dialog -> Install from Internet
Select Root Install Directory Dialog: -> C:\software\cygwin and install for “All Users”.
Strictly choose this directory as the rest of instructions follow this directory structure.
Select Local Package Directory: -> C:\Temp.
Select Your Internet Connection: -> Direct Connection
Choose A Download Site: -> ftp://mirror.mcs.anl.gov has always worked well, but you may desire a closer site.
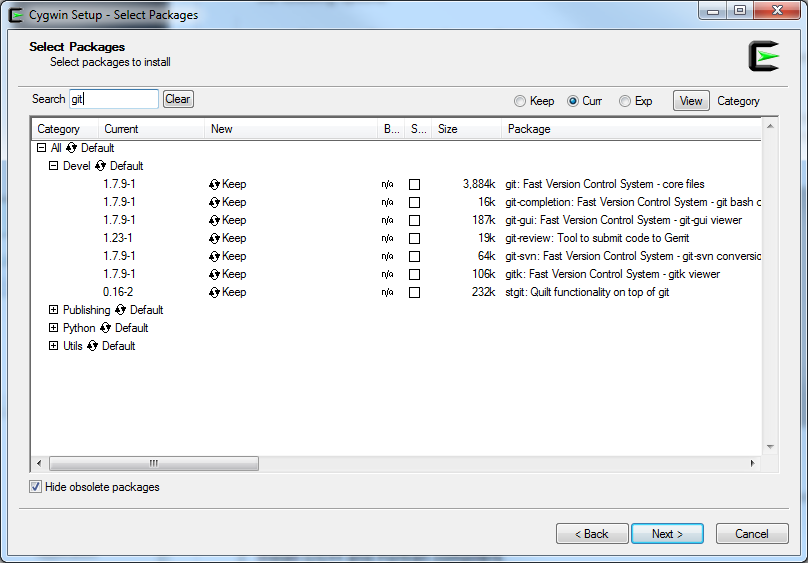
Select Packages:-> Ensure that at least the following are selected (we may have to iterate on this as I do not have a clean install of which to work in providing guidance).
All default packages (some of the below may be default)
bash (default) (for bash users)
diffutils
gcc
g++
git
gzip (default)
make
patch and patchutils
python
tar (default)
tcsh (for t-shell users)
Click the refresh arrows next to Devel and set it to install for each of them.
Create Icons: Be sure to uncheck the annoying icons at the end.
After installed, start cygwin with *Cygwin.bat* and rename the cygwin linker as it will conflict with PETSc: “mv /usr/bin/link.exe /usr/bin/link-cygwin.exe”. This must be repeated any time cygwin is updated.
Install C/C++ and Fortran compilers.
Microsoft Visual C++ 2010 and Intel Fortran. I suggest installing everything in its default location. The hints that I provide below will assume this.
Download and install • Microsoft Visual Studio Professional 2013 (VS13) and Intel Parallel Studio XE (XE13) for Windows
For Intel, please choose 2013 SP1 Update 2
any versions from 2012 and on should be okay for both products
This takes about two hours or more depending on your internet connection speed and your computer
Setup Cygwin tcsh shell. A Cygwin.bat should exist in the C:\software\cygwin directory. Copy and paste this file and rename it to cygwin-tcsh.bat
Open the cygwin-tcsh.bat with your text editor and replace it with the code below.
@ echo off
call "C:\Program Files (x86)\Microsoft Visual Studio 12.0\VC\vcvarsall.bat" x86
call "C:\Program Files (x86)\Intel\Composer XE\bin\ifortvars.bat" ia32
C:\software\cygwin\bin\tcsh.exe -l
Make sure the paths are correct and the files do exist.
Install HDF5.
Go to: HDF5 Group website
Download: Windows (32-bit) Compilers: CMake VS 2010 C, C++, IVF 12, RWDI
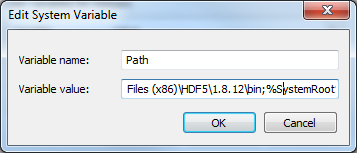
When you install, make sure the path is added for all users and set to C:\Program Files (x86)\HDF5\1.8.12
If you receive “Cannot set Path. Path is too long” message, Click on Start -> Control Panel -> System -> Advanced System Settings -> Environment Variables -> In “System Variables” box find “Path” -> Edit… -> Copy and paste the path to a text editor temporarily -> replace the path with a semicolon -> hit Okay -> re-install HDF5 -> Reload Path variables including the HDF5 path
Install PETSc. (Please follow carefully from here)
To make sure that you have installed Intel XE compilers correctly:
Right click on cygwin-tcsh.bat file and click “Run as Administrator” (always do this when opening this file)
On command line type:
cl foo.c
You should receive C/C++ compiler version and error saying that the file does not exist. This means that your C/C++ compiler has been installed correctly.
Again On command line type:
ifort foo.f
You should receive Fortran compiler version and error saying that the file does not exist. This means that your C/C++ compiler has been installed correctly.
..image:: ../figs/installedXE.png
Go to C:\software on the command prompt
Type:
git clone https://gitlab.com/petsc/petsc petsc
cd petsc
git checkout 8c7fbf4f8491a74970a1205819563feba7a8e746
Obtain XXX from Step 3 on the Linux Installation Instructions page.
NOTE: PFLOTRAN currently uses a snapshot of PETSc ‘maint’ (release) branch. The only supported snapshot/version is specified by the changeset-id above. The supported version will change periodically as we need bug fixes or new features and changes will be announced on the mailing lists. The supported version of petsc is used on the buildbot automated testing system.
If this prompt times out, go to https://gitlab.com/petsc/petsc online
Make a bitbucket account
Follow instructions on how to setup SSH account public and private keys for git:
After the setup try the git command again and pull the repository
If this does not work, go download the static version of PETSc
Install MPICH2
Unofficial Binary Packages:
Click and Install Windows x86 (32-bit) version
In PETSc-git directory, select and option configure. Replace with the following commands:
#!/bin/csh
setenv PETSC_DIR `pwd`
./config/configure.py --with-cc='win32fe cl' --with-fc='win32fe ifort' --with-cxx='win32fe cl' --with-mpi-dir=/cygdrive/C/Progra~2/MPICH2 --with-blas-lapack-dir=/cygdrive/c/Progra~2/Intel/Compos~3/mkl/lib/ia32 --with-clanguage=c --CFLAGS='-D_CRT_SECURE_NO_DEPRECATE -MTd' --FFLAGS='-MTd' --CXXFLAGS='-MTd' --with-debugging=yes --with-numdiff=0 --with-valgrind=0 --ignore-cygwin-link --with-c2html=0 --download-sowing=1 \
--with-hdf5=1 \
--with-hdf5-lib=/cygdrive/C/Progra~2/HDF5/1.8.12/lib/hdf5.lib \
--with-hdf5-include=\[/cygdrive/C/Progra~2/HDF5/1.8.12,/cygdrive/C/Progra~2/HDF5/1.8.12/include\]
Make sure the hdf.lib file exists under that path and check to make sure all the paths exist.
Progra~2 is the shortname notation of Program Files (x86)
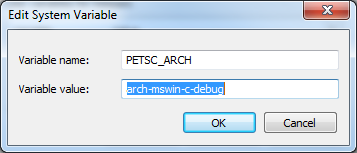
Set the environment variables PETSC_ARCH and PETSC_DIR:

In the command prompt, execute configure
Then follow instructions on the command prompt to finish compilation
it’s okay if the second statement (test) doesn’t work
make PETSC_DIR=c/cygdrive/c/software/petsc-git PETSC_ARCH=arch-mswin-c-debug all
make PETSC_DIR=c/cygdrive/c/software/petsc-git PETSC_ARCH=arch-mswin-c-debug test
Clone in pflotran
In the command prompt, go to C:software and clone in pflotran using Git
git clone https://bitbucket.org/pflotran/pflotran
If htmls doesn’t work, set up SSH for Git (you may have done this already above):
git clone ssh://git@bitbucket.org/pflotran/pflotran
Create Visual Studio 2013 project called ‘pflotran’ with Intel Fortran (empty project).
Add the PFLOTRAN source files list in the pflotran/src/pflotran/makefile to source folder of the project
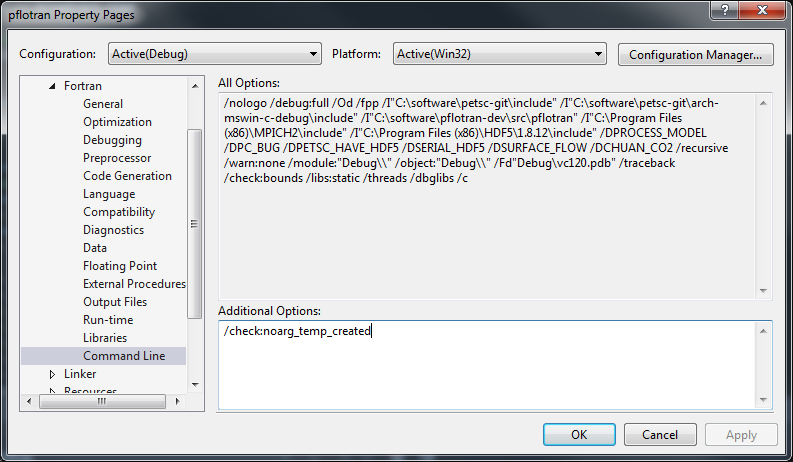
Set a boat load of settings under Project -> pflotran Properties. I list my settings as displayed through the Command Line entry under Fortran and Linker. You must figure out how these are set within the dialogs. Make sure all the paths are set correctly and all the files exist.
Based upon a default installation of Visual Studio 2013 and Intel Fortran Composer 15, the following property changes would have to be made (but make sure to track in the Command Line entry):
- Fortran Tab:
Preprocessor | Preprocess source files | Yes
General | Additional included libraries | <add from example screenshot>
General | Preprocessor definitions | <add from example screenshot>
Code generation | Enable recursive routines | Yes
General | Compile time diagnostics | Disable all
Run-time | Check stack frame | No
Libraries | Runtime library | Debug multithreaded
Additional options: /check:noarg_temp_created
- Linker Tab:
General | Additional library directories | <add from example screenshot>
Input | Ignore all default libraries | No
Input | Ignore specific libraries | <add from example screenshot>
Manifest file | Generate manifest | No
Input | Additional dependencies | <add from example screenshot>
Visual Studio setup dialog
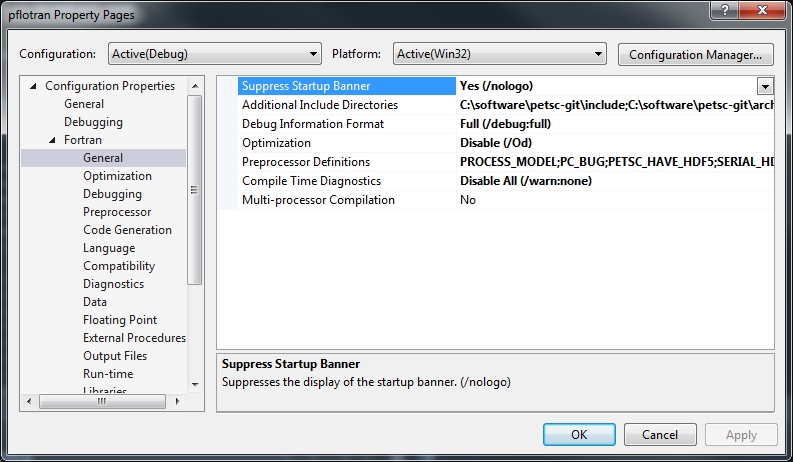
Fortran command line
Linker command line

Congratulations. Build the project.